Prep Time: ~15 minutes (plus resting)
Bake Time: ~45 minutes
Total Time: ~5 hours (including rising)
Yields: 1 medium loaf
Introduction
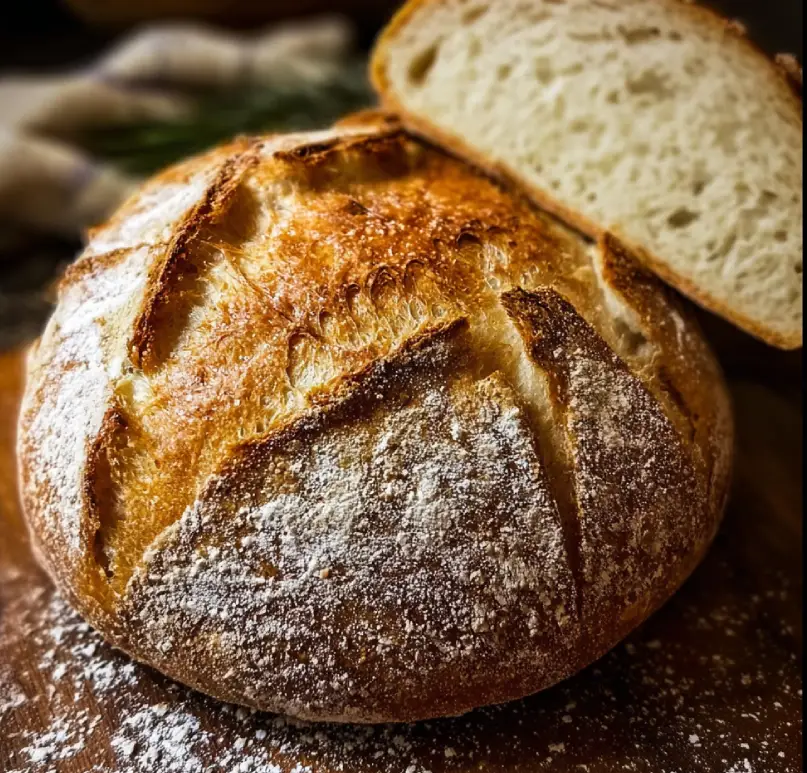
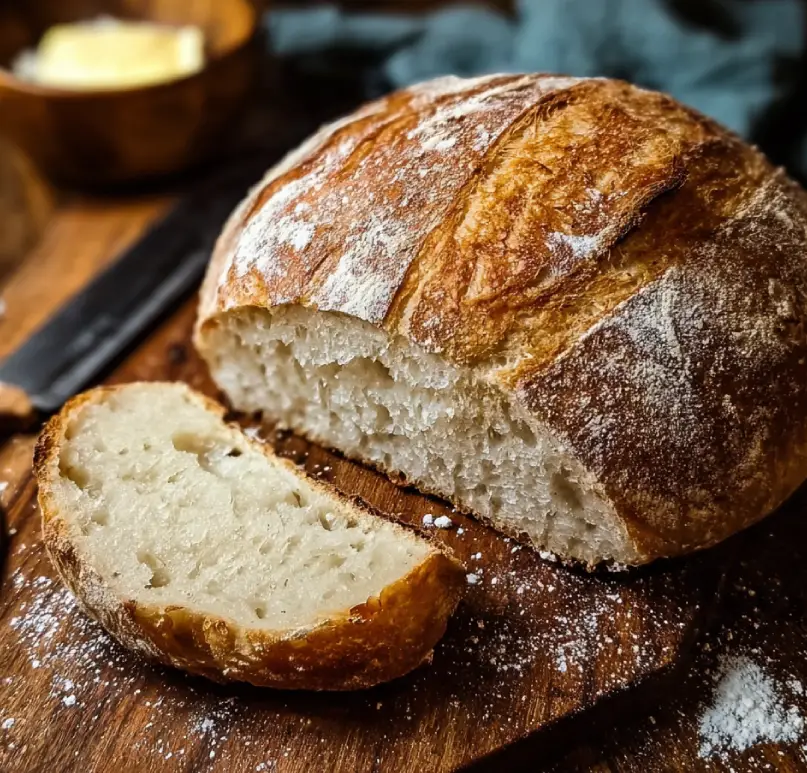
If you’ve ever thought gluten-free bread is too difficult or lacks good texture, this No-Knead Gluten-Free Bread proves you can have easy, satisfying homemade bread without kneading or complexity. With simple ingredients, a single bowl mixing method, a long rest instead of hand-kneading and a final bake, you’ll end up with a loaf that’s crisp on the outside, pleasantly soft inside and full of flavour.
Why No-Knead Gluten-Free Bread Is Worth Celebrating
Traditional bread relies on gluten – the protein network that gives structure and chew. For a gluten-free version, you bypass the need for kneading by using time, moisture, and the right binders so the loaf still rises and holds together beautifully. Because you’re skipping the kneading and relying on simple technique, the recipe is approachable for any baker. And when it turns out soft, hearty and versatile, it becomes a reliable part of your bread-making repertoire.
Ingredients
- 3 cups gluten-free flour blend (ensure it contains a good mix of starches + binders)
- 1 teaspoon salt
- 1 tablespoon sugar
- 1 ½ teaspoons active dry yeast
- 1 ½ cups warm water (≈110 °F / 43 °C)
- 2 large eggs
- 2 tablespoons olive oil
- Optional add-ins: 1 tablespoon chopped fresh rosemary, 2 tablespoons sesame seeds, or ½ cup chopped nuts
The Art of Creating No-Knead Gluten-Free Bread
Instead of kneading, this loaf relies on a sticky, well-hydrated dough and a long rest period so the flour blend hydrates fully and the yeast works gradually. You stir the dough, cover it, let it sit for several hours (or overnight), then gently shape and bake. The result is a “hands-off” style loaf but one that still delivers texture, flavour and structure. Because you trust the resting process over manual work, you get bread that feels artisan-style yet is manageable at home.
Step-by-Step Instructions
Step 1: Activate Yeast & Mix Wet Ingredients
In a small bowl, combine the warm water, sugar and yeast. Stir lightly and let rest about 5 minutes until foamy. In a large mixing bowl, whisk together the eggs and olive oil. Once yeast is active, stir it into the wet mixture.
Professional Tip: Ensure the water is warm but not too hot (≈110 °F) so you don’t kill the yeast.
Key Points: Active yeast ensures proper rise in gluten-free dough.
Step 2: Combine Dry Ingredients & Form Dough
In another bowl, whisk together the gluten-free flour blend, salt and any optional seed or nut add-ins. Pour the wet mixture into the dry and stir until you get a thick, sticky dough. You don’t knead—just stir until combined. Cover the bowl loosely with plastic wrap and let the dough rest for at least 4–5 hours (or up to overnight) at room temperature.
Professional Tip: The dough should be more moist than traditional wheat dough—it will look more like a thick batter than a firm ball.
Key Points: Extended rest replaces kneading in gluten-free breads.
Step 3: Shape and Prepare for Baking
After the resting period, pre-heat your oven to 425 °F (≈220 °C). Line a baking dish or loaf pan with parchment paper. Lightly dust your hands or the top of the dough with flour (gluten-free) and gently shape it into a round or oval loaf in the pan. Cover loosely and let rest another 30 minutes.
Professional Tip: Shape gently so you don’t degas the dough too much—gluten-free structure is delicate.
Key Points: Final rise helps create oven-spring even without kneading.
Step 4: Bake the Bread
Place the loaf in the pre-heated oven and bake for about 30 minutes covered (if using a Dutch oven or lidded dish), then remove cover and continue baking about 15 minutes more until the crust is golden and the loaf sounds hollow when tapped.
Professional Tip: A loaf thermometer reading of ~200-205 °F (≈93–96 °C) indicates doneness.
Key Points: Proper bake sets crumb and crust in gluten-free breads.
Step 5: Cool & Serve
Remove the bread from the oven, transfer to a cooling rack and let cool completely (at least 30 minutes) before slicing. This helps the interior set and prevents gummy texture. Slice and serve with butter, soup or your favourite spread.
Professional Tip: Use a serrated knife and cut slowly to preserve crumb structure.
Key Points: Proper cooling improves texture and flavour.
Professional Tips for Mastery
- Use a high-quality gluten-free flour blend that contains a mix of starches and protein or binder (e.g., rice flour, tapioca starch, potato starch, xanthan/psyllium).
- Because gluten-free doughs lack the stretch of wheat doughs, avoid aggressive shaping or heavy handling.
- Increase hydration if your dough seems dry—gluten-free loaves often need more water for better texture.
- If the crust browns too quickly, tent loosely with foil for the final bake minutes.
- Store leftover slices wrapped in foil or sealed bag; toast before serving for refreshed texture.
Creative Variations
- Herb-olive loaf: Fold in 2 tablespoons chopped olives and 1 tablespoon chopped fresh rosemary into the dough.
- Seed-topped loaf: Sprinkle sesame seeds, sunflower seeds or flax on top before baking for crunch.
- Sweet version: Reduce salt to ½ teaspoon, omit herbs, add ½ cup chopped dried cranberries and ½ teaspoon cinnamon for a dessert-style loaf.
- Mini loaves or rolls: Divide dough into two smaller loaves or shape into rolls and adjust bake time accordingly (~20–25 minutes for rolls).
Perfect Pairing Ideas
Serve with a spread of rustic butter and coarse sea salt, alongside a bowl of warm tomato-basil soup, or use it to build an open-faced sandwich with smoked turkey and avocado. For sweeter variation, slice and serve with almond butter and honey for brunch.
Storage Guidelines
Let the loaf cool completely, then wrap in plastic or foil and store at room temperature for up to 2 days. For longer storage, slice and freeze individual pieces in a sealed bag for up to 1 month; toast from frozen before serving.
The Science Behind the Flavor
In gluten-free baking, you lack the gluten network responsible for chew, structure and rise. Instead you rely on hydration, longer rest and binders (such as xanthan gum or psyllium) so the dough can trap gas and develop structure. No-knead methods work by allowing time to do the work rather than mechanical kneading, which in wheat breads aligns gluten strands via kneading. In gluten-free loaves the resting and hydration help starches gelatinize and binders form networks to support structure. Bake with Jack+1
Troubleshooting Common Issues
- If the loaf is very dense or heavy, it may have lacked enough binder or hydration. Next time increase water by 10–15 mL and ensure your flour blend quality is good.
- If the loaf is gummy or under-baked inside, extend baking time or reduce loaf diameter so it bakes through.
- If the crust is too hard or burnt, reduce oven temperature by 10–15 °F or tent with foil during final bake minutes.
- If flavour is flat or bland, add ½ teaspoon garlic powder, 1 tablespoon Parmesan or 1 teaspoon dried herbs for boost.
Additional Inspirations
Once you’ve mastered this loaf, try adapting the method for stuffed bread: roll dough out into a rectangle, place roasted garlic butter and spinach in the centre, fold over and bake as a filled loaf. Or try a focaccia-style skillet version with olive oil and thyme. The no-knead, gluten-free concept opens many creative doors.
Conclusion
No-Knead Gluten-Free Bread gives you homemade bread without the fuss of kneading and with the flexibility to tailor flavour and texture. With thoughtful technique, quality ingredients and time on your side, you’ll have a beautiful loaf you’ll feel proud to slice and serve.